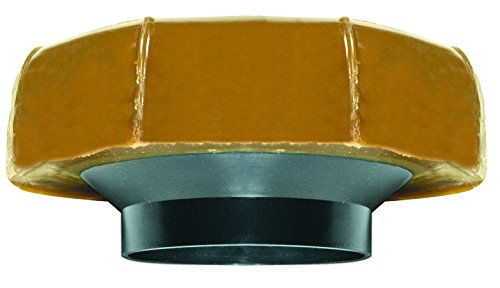
A wax ring failure shows up as a sewer smell, water pooling at the base of the toilet, or a rocking bowl that has loosened its seal. Replacing it is a genuine DIY repair with no special skills required: you lift the toilet, swap the ring, and reseat the bowl. Most homeowners finish the job in under two hours. This guide walks through every step, explains how to choose the right wax ring for your toilet and floor configuration, and flags the handful of mistakes that turn a simple job into an expensive one.
Quick Answer
To replace a toilet wax ring, shut off the water, empty the tank and bowl, disconnect the supply line, remove the bolt caps and nuts, rock the toilet free, and lift it off. Scrape away the old wax from both the flange and the horn, press a new standard-thickness wax ring onto the toilet horn, lower the toilet straight down onto the flange bolts, and press evenly to compress the wax. A standard Korky or Fluidmaster wax ring with a polyethylene horn extension fits most toilet-to-flange gaps and prevents sewer gas leaks. The whole job typically takes 90 minutes to two hours.
The wax ring is the unsung hero of your bathroom plumbing: a simple donut of petroleum wax that creates a watertight, gas-tight seal between the base of the toilet and the drain flange set into the floor. It never needs maintenance under normal conditions and can last the full life of the toilet. When it does fail, though, the signals are unambiguous: a persistent sewer smell that no amount of cleaning removes, water appearing around the base of the bowl after a flush, or a toilet that rocks and has broken the seal over time. All three mean one thing: the wax ring has failed and needs replacing.
This guide follows the same research approach we use across the site. Rather than doing lab teardowns, we compare how the components are engineered, the published specs that predict fit and seal quality, EPA WaterSense efficiency context for the toilet itself, and the repair patterns that show up consistently across aggregated owner reports and licensed plumber resources. The wax ring job is one of the few plumbing repairs that genuinely belongs in the DIY category for most homeowners, but it does require lifting a heavy toilet and working with a drain opening, so the preparation steps matter as much as the installation itself.
Start here. Before you buy any parts, confirm which symptom you have. A rocking toilet that has not yet started leaking may only need the closet bolts tightened or replaced, not a full wax ring swap. A smell alone in an otherwise stable toilet might be a dry P-trap in a floor drain nearby, not the wax ring. Only water at the base of the bowl after a flush, or a toilet that rocks and has a smell, reliably signals a failed wax ring. Confirm the diagnosis before committing to the job.
What is a toilet wax ring and when does it fail?
A toilet wax ring is a donut-shaped seal made of petroleum wax that sits between the bottom of the toilet horn and the drain flange in the floor, creating a watertight and gas-tight connection. It fails when the toilet rocks repeatedly over time, when the floor settles and creates a gap, or when the wax hardens and cracks after many years. Signs of failure are water at the base of the toilet, a persistent sewer gas smell, or evidence of floor damage from repeated slow leaks beneath the bowl.
The design is deliberately simple: a thick ring of wax that compresses under the weight of the toilet and flows into any small irregularities between the toilet horn and flange, producing a seal that does not require bolts, clamps, or adhesive. That simplicity is its strength and its weakness. It works perfectly as long as the toilet stays still and the flange sits at the right height. When the toilet rocks, the wax is kneaded back and forth and eventually fails to maintain its seal. When the flange sits below the floor surface after a tile remodel, the gap is too large for a standard ring to bridge.
Wax rings are not adjustable or reusable. Once a wax ring has been compressed under the weight of a toilet, it takes the shape of that specific installation. If you lift the toilet even slightly, the wax no longer provides a reliable seal and a new ring is required. This is the single most important rule of the job: buy a new wax ring every time the toilet comes off the floor, even if you lifted it only to investigate another problem.
What tools and materials do you need for a wax ring replacement?
To replace a toilet wax ring you need a new wax ring sized for your flange height, a putty knife or scraper for cleaning old wax, an adjustable wrench, a sponge and bucket to empty the tank and bowl, rubber gloves, and a helper for lifting the toilet safely. Optional but strongly recommended are new closet bolts, a plastic flange shim set, and a fresh supply line if the existing one is more than five years old.
Gather everything before you start, because once the water is off and the toilet is off the floor, you do not want to make a hardware run mid-job. The list below covers the essentials plus the upgrades worth making while you have the floor open.
Item
Why You Need It
Notes
New wax ring
The replacement seal itself
Match to flange height: standard or extra-thick
Adjustable wrench
Remove closet bolt nuts and supply line
Channel-lock pliers also work
Putty knife or stiff scraper
Clean old wax from flange and horn
Plastic scraper on porcelain to avoid scratches
Rubber gloves
Wax, grime, and drain contact
Disposable nitrile preferred
Sponge and bucket
Empty tank and bowl before lifting
Old towels on the floor too
New closet bolts
Replace if corroded or stripped
Always worth replacing when flange is exposed
Helper for lifting
A toilet weighs 50 to 120 lbs
Critical for back safety
Plastic flange shims
Level a rocking toilet after reseating
Better than caulk for long-term stability
Braided steel supply line
Replace if old or kinked
Cheap insurance against leak at reconnection
How do you choose the right wax ring for your toilet?
Choose a standard wax ring when the top of the drain flange sits flush with or slightly above the finished floor. Choose an extra-thick or double-stack wax ring when the flange sits below the floor surface, which commonly happens after a tile remodel adds height. Wax rings with a built-in polyethylene horn extension are preferred for deep flanges because the extension guides waste into the drain and helps maintain alignment. Most toilets accept either a standard or an extended ring, and universal-fit rings cover roughly 4-inch standard flanges used in nearly all residential installations in the United States.
The most common mistake in wax ring replacement is choosing the wrong thickness. The goal is to have enough wax to fully bridge the gap between the toilet horn and the inside of the flange, with a little extra that compresses as the toilet is seated. Too thin, and the wax does not fully seal. Too thick, and the toilet rocks because the bowl base cannot reach the floor evenly. Measure the gap with the toilet off the floor by pressing the old ring and observing how much compression it took to flatten, or measure the distance from the floor to the top of the flange with a straightedge. If that distance is three-quarters of an inch or more, go extra-thick or stack two rings.
A wax ring with a polyethylene funnel extension is the better default choice for most installations. The plastic horn seats into the flange opening and keeps the wax centered as you lower the toilet, which is valuable because lowering a heavy toilet perfectly straight onto two small bolts is harder than it sounds. The extension also channels solid waste cleanly into the drain without it contacting the wax on the way through, which preserves the seal over time. On a standard installation, a Korky or Fluidmaster wax ring with horn extension, sized for a 3-inch or 4-inch flange, handles the vast majority of residential toilets including the TOTO Drake, Kohler Highline, American Standard Champion 4 and Cadet 3, Woodbridge T-0001 and T-0019, Swiss Madison St. Tropez, and Gerber Viper and Avalanche.
Standard Pick
Korky 6000BP Universal Wax Ring
Standard flange height
4.7
A wax-free alternative that uses a flexible rubber seal instead of petroleum wax, repositionable and reusable if you need to lift the toilet again. Fits standard 3-inch and 4-inch flanges. Widely stocked at home improvement stores.
The right choice when the flange sits below the finished floor after a tile or hardwood remodel. The thicker wax body bridges gaps up to half an inch. Includes a polyethylene horn extension for guidance and clean waste channeling.
A foam-based gasket seal that installs without wax, tolerates minor floor unevenness, and can be repositioned if the toilet needs to be lifted again within a short period. Preferred by some plumbers on tile floors where alignment is trickier.
How do you replace a toilet wax ring step by step?
Replace a toilet wax ring by shutting off the water, emptying the tank and bowl, disconnecting the supply line, removing the bolt caps and closet bolt nuts, rocking the toilet free of the old wax seal, lifting it off and setting it aside, scraping all old wax from the flange and the toilet horn, pressing the new wax ring onto the toilet horn, then carefully lowering the toilet onto the flange bolts and pressing down evenly to compress the wax. Reinstall the nuts, reconnect the water, test for leaks, and caulk the base if desired.
Work through these steps in order. The job has a natural sequence and none of the individual steps require brute force, but several of them have a single mistake that causes a failed seal or floor damage. Read each step before you perform it.
Step 1: Shut off the water supply
Turn the shutoff valve behind the toilet fully clockwise until it stops. Then flush the toilet and hold the handle to drain as much water from the tank as possible. The float cup will drop but water may trickle back in around a partially open valve; if that happens, turn off the home's main supply instead and plan to replace the shutoff valve when the toilet is back in place. After the main flush, lift the tank lid and confirm the tank is emptying. Using a sponge and bucket, remove the remaining water from the tank until the bottom is dry. Then bail or sponge the water from the bowl. A plunger pressed firmly into the bowl trap can push the remaining water down the drain, leaving the bowl mostly dry for easier handling. This step matters: a full bowl adds weight to an already heavy toilet and will spill when you tilt it.
Tip. Lay two or three old towels on the bathroom floor before you start. The toilet is going to rest on the floor next to the flange opening, and towels protect the floor from the porcelain and give you a clean surface to work on. They also catch the inevitable drips from the tank and bowl as you move the toilet.
Step 2: Disconnect the water supply line
With the water off and the tank empty, unthread the supply line coupling nut at the bottom of the tank. Hold the fill valve shank inside the tank with one hand to keep it from spinning. Once loose, remove the line completely and set it aside. If the supply line is more than five years old, stiff, or shows any mineral buildup at the connection, replace it with a new braided stainless steel line. A fresh line costs very little and removes the most common source of post-repair drips, which can otherwise be blamed on the wax ring when they are actually coming from a reused connection. See our guide to the best toilet fill valves of 2026 if you want to upgrade the fill valve at the same time, which adds only a few minutes to the total job.
Step 3: Remove the bolt caps and closet bolt nuts
At the base of the toilet on each side, you will find plastic snap-on caps covering the closet bolt nuts. Pry them off with a flat screwdriver. Beneath each cap is a nut threaded onto the closet bolt, which passes up through the flange in the floor and anchors the toilet. Use an adjustable wrench to unthread each nut counterclockwise. If the bolts spin instead of the nuts, grip the bolt head with pliers from above while turning the nut below. Corroded or stripped bolts that spin freely without tightening are a sign that the closet bolts should be replaced along with the wax ring. Corroded bolts are also harder to unthread, so spray them with penetrating lubricant and wait a few minutes if they resist. Remove the nuts and any washers and set them aside, or plan to discard them if you are using new hardware.
Step 4: Rock the toilet free and lift it off
Before lifting, double-check that both nuts are fully removed. Grip the toilet firmly on both sides of the bowl at waist height, not by the tank. Twist or rock the bowl gently side to side to break the wax seal. Once you feel the toilet come free, lift it straight up and off the two closet bolts. This is the step that benefits most from a helper: a standard two-piece toilet weighs between 50 and 100 pounds, and lifting it awkwardly can injure your back or drop it on the floor. The toilet should clear the bolts cleanly; if it catches, check that the nuts are fully off. Set the toilet on its side on the towels, with the horn opening facing up or sideways away from the floor to avoid contaminating the tiles with residual waste.
Avoid this mistake. Do not set the toilet down on its base if the horn is still partially full of water or if there is old wax on the horn opening. Lay it on its side on a doubled towel to keep both the floor and the porcelain clean. Wax is petroleum-based and very difficult to remove from tile grout or vinyl flooring.
Step 5: Stuff the drain opening and inspect the flange
With the toilet off the floor, you will see the open drain flange and likely a considerable amount of old wax. Immediately stuff an old rag, plastic bag, or purpose-sold drain plug into the drain opening. Sewer gas rises readily from an open drain, and a stuffed opening keeps the bathroom from filling with the sulfur smell while you work. Now inspect the flange. A toilet floor flange is typically PVC, cast iron, or brass, and it should sit flush with the finished floor or very slightly above it. Look for cracks, chips, a broken ring, or a flange that sits noticeably below the tile surface. A cracked or broken flange must be repaired or replaced before you install a new wax ring; seating a toilet on a damaged flange will produce another leak almost immediately. Flange repair kits that bolt over the existing ring are available for cast iron and PVC flanges and are a DIY-friendly fix for a damaged ring that is otherwise intact at the drain connection.
Step 6: Remove all old wax
Use a stiff plastic putty knife or scraper to remove all old wax from the floor flange and from the toilet horn. Work carefully around the flange to avoid scratching or cracking it. Old wax can also be on the floor around the flange; remove it from the floor too, since any residue will prevent the new ring from seating cleanly. On the toilet, scrape the horn opening clean. Wax that is very stiff or cold can be softened slightly with a heat gun or hair dryer at low setting, though care is needed near the porcelain. Mineral spirits on a rag cleans petroleum wax residue cleanly without leaving a slick surface. Once both surfaces are clean and dry, inspect the closet bolts. Replace them now if they are corroded, bent, or if the nuts no longer tighten without the bolt spinning. New bolts are inexpensive and a corroded bolt left in place is the single most common reason a toilet rocks again within a year of a wax ring replacement.
Step 7: Install the new wax ring
Press the new wax ring onto the toilet horn with the wax side facing away from the toilet, or place it onto the flange with the wax side up, depending on which style of installation feels more controllable. Most plumbers prefer attaching it to the toilet horn because they can confirm it is centered before the toilet goes down. If the ring has a polyethylene horn extension, make sure the extension faces toward the drain (downward when the toilet is right-side-up). Press the ring on firmly so it grips the horn evenly all around. Do not drop or roughly handle the toilet after the ring is in place, as a deformed wax ring may not seal correctly.
Critical detail. Wax is temperature-sensitive. In a cold bathroom (below about 60 degrees Fahrenheit), the wax is stiffer and may not compress and flow to fill gaps as readily. Let the wax ring warm to room temperature before installation, especially in winter or in an unheated space. A warm, pliable ring seals much more reliably than a cold, stiff one.
Step 8: Lower the toilet onto the flange
With the wax ring in place, bring the toilet over the flange opening. The two closet bolts must thread up through the two holes in the toilet base, so alignment is important. Straddle the flange and look down to line up the holes before you commit to lowering the full weight. Do not set the toilet down off-center and then try to slide it into position: sliding drags the wax sideways and breaks the seal before it is made. Lower the toilet straight down, thread the bolts through the holes, and press firmly and evenly until the toilet base meets the floor. Apply a controlled, firm downward push on both sides of the bowl alternately, not a rocking motion. The wax will compress and you should feel the toilet settle solidly onto the floor. If it rocks or one side sits higher, the wax is not fully compressed on that side; press that side more firmly before proceeding.
Step 9: Secure the closet bolts and replace the caps
Slide the washers onto the closet bolts and thread the nuts down by hand. Tighten each nut in small increments, alternating between the two bolts just as you would when tightening lug nuts on a wheel, to bring the toilet down evenly. The porcelain base can crack if you overtighten one side before the other is seated. Snug each nut so the toilet does not rock, then add a firm but not extreme tightening. Do not crank hard: the goal is a stable toilet, not a cracked porcelain base. If the bolt extends too far above the nut to allow the plastic cap to snap on, score the bolt with a hacksaw and snap off the excess. Replace the plastic caps. The toilet should now sit firmly on the floor with no rocking. If any rocking remains after the bolts are tight, slide plastic toilet shims under the base at the rocking point to level it before the final cap installation.
Step 10: Reconnect the water and test for leaks
Remove the rag from the drain opening. Reconnect the supply line to the fill valve, hand-tight plus a quarter turn with the wrench. Open the shutoff valve slowly and let the tank fill. Flush three to four times, watching the base carefully after each flush for any water seeping from underneath the toilet. A successful wax ring replacement produces no water at the base. Check also under the tank for drips at the supply line connection. If water does appear at the base only after flushing, the wax ring has not sealed; the toilet must come off, the wax must be cleaned again, and the process must repeat with a new ring. This is why removing all old wax in step 6 is so important: any residue prevents a clean compression.
Editorial Take
The most consistent pattern in wax ring failures we see reported by homeowners is this: the toilet was seated on a cold wax ring, then rocked side to side during tightening to "adjust" alignment, and the wax was sheared rather than compressed. The best technique is to lower the toilet straight down without any lateral movement, apply firm downward pressure evenly, and do all alignment before the toilet touches the wax. Once the wax contacts both surfaces, the only correct direction is down. Treat the toilet like a plane landing: commit to your alignment approach on final descent, not after you land.
Do you need to caulk around the base of the toilet?
Caulking around the toilet base is optional and somewhat debated. In favor of caulking: it prevents water from getting under the toilet from floor cleaning, stabilizes the bowl, and produces a finished appearance. Against caulking: if the wax ring ever fails again, a caulked base traps leaked sewage water under the toilet instead of allowing it to appear at the base where it can be spotted quickly. Most licensed plumbers leave the back of the toilet base uncaulked or skip caulking entirely, so any future leak signals immediately. This is the approach recommended by many plumbing inspection bodies.
If you do choose to caulk, use a 100 percent silicone caulk in a color that matches the floor, and leave a one-inch gap at the back of the toilet uncaulked. That gap acts as a leak detector: if the wax ring ever fails, water will appear at the uncaulked point rather than being trapped under the sealed bowl where it can damage the subfloor for months before discovery. Apply the caulk after the toilet has been confirmed leak-free for at least 24 hours, and tool it smooth before it skins over.
What are the most common wax ring replacement mistakes?
The most common wax ring replacement mistakes are reusing the old wax ring, failing to remove all old wax before installing the new ring, sliding the toilet sideways after the wax contacts the flange, overtightening the closet bolts and cracking the porcelain, failing to inspect or repair a damaged flange before reseating, and using a standard-thickness ring on a flange that sits significantly below the finished floor. Each of these produces either an immediate leak or a slow failure that becomes apparent weeks later.
Working through the full step sequence above avoids all of these, but a few specific mistakes deserve extra emphasis because they produce failures that look like a leak at the wax ring but are actually caused by something else entirely:
Not replacing the closet bolts. Closet bolts corrode over time, especially in humid bathrooms. A bolt that looks intact may have corroded enough that the nut will not tighten firmly, and a loose bolt allows the toilet to rock, which destroys the new wax ring in weeks. When the flange is exposed, replacing the bolts costs pennies and five minutes.
Skipping the flange inspection. A cracked flange ring cannot support the toilet properly, and no amount of wax will compensate. Cast iron flanges in older homes frequently crack around the bolt slots. A repair ring that bolts over the existing flange is the correct fix; a new wax ring over a cracked flange is money spent twice.
Not seating the toilet completely. If the toilet base rocks after the nuts are tight, the wax has not been fully compressed on one side, or the floor is not level enough for the toilet to sit flat. Plastic shims solve a floor-level issue; a more evenly applied downward force during installation solves the compression issue. A rocking toilet will almost always produce a second wax ring failure within a year.
Which wax rings do the top toilet brands recommend?
TOTO, Kohler, American Standard, Woodbridge, Swiss Madison, and Gerber all use standard 3-inch and 4-inch drain flanges that accept universal wax rings from Fluidmaster, Korky, or Harvey. None of these brands require a proprietary wax ring. TOTO recommends a wax ring with horn extension for all Drake, UltraMax II, Aquia IV, and Vespin II installations to ensure proper guidance into the 3-inch trapway. Kohler recommends a standard or extra-thick ring based on flange height for the Highline, Cimarron, Santa Rosa, and Memoirs lines. American Standard specifies a wax ring with horn for the Champion 4 and Cadet 3, where the large 2-3/8-inch trapway benefits from the guided extension.
The practical takeaway: no matter which of the major toilet brands you have, a universal wax ring with a polyethylene horn extension from Fluidmaster or Korky will serve the installation. The horn extension is especially worth using on a TOTO or American Standard toilet because their wide trapways mean the horn opening is large enough that a plain wax ring can potentially shift off-center. The extension keeps everything aligned on the way down and channels waste cleanly through the larger opening.
For a one-piece toilet such as the TOTO UltraMax II, Woodbridge T-0001, T-0019, or Swiss Madison St. Tropez, the wax ring replacement process is identical to a two-piece toilet. The difference is weight: one-piece toilets often weigh 90 to 120 pounds. A helper is not optional on a one-piece; it is required. If lifting a one-piece is impractical alone, a toilet removal dolly or the help of two people is the correct approach. The wax ring itself is the same universal part regardless of toilet style. If you are already doing this job on a toilet that is more than fifteen years old or one that flushes weakly even with a full tank, it is worth reviewing our guide to the best flushing toilets to see whether replacing the toilet entirely makes more sense than maintaining an old low-MaP design.
Editorial Take
A wax ring replacement is the right call any time the toilet is already off the floor for another reason, such as repairing a cracked flange, replacing a floor, or investigating a rocking bowl. In that context the marginal cost of a new wax ring is almost zero and the alternative is reseating on a ring that was already compressed, which is a known path to a repeat leak. Buying a wax ring as insurance every time the toilet comes up is the most cost-effective plumbing habit in residential maintenance. They cost less than a coffee. Use a new one every time.
How do wax ring alternatives compare to traditional wax?
Wax-free toilet seals such as the Sani Seal BL01 foam gasket or the Korky 6000BP rubber seal offer repositionability and reusability that traditional wax rings do not, at the cost of a slightly more expensive part and a less forgiving installation on uneven floors. Traditional wax rings remain the most common, most widely available, and cheapest option, and they produce a reliable seal when the installation technique is correct. Wax-free alternatives are a good choice when the floor is known to be uneven, when the toilet may need to be removed again soon, or when the installer prefers not to work with petroleum wax.
Seal Type
Best For
Repositionable
Gap Tolerance
Rating
Standard wax ring (with horn extension)
Most standard installations
No
Good (to 1/4 in.)
4.7
Extra-thick wax ring
Flange below floor level
No
Excellent (to 1/2 in.)
4.6
Double-stacked wax rings
Very recessed flange
No
Up to 3/4 in.
4.3
Foam gasket (Sani Seal)
Uneven floors, tile transitions
Yes
Good (flexible)
4.4
Rubber seal (Korky 6000BP)
Repeat removal jobs
Yes
Standard
4.5
For a first wax ring replacement on a standard installation, a traditional wax ring with horn extension is the right choice for the large majority of homeowners. The material is time-tested, universally available at any hardware store, inexpensive, and produces a seal that can last the full life of a properly installed toilet. Wax-free alternatives earn their place on a tile floor after remodeling, when alignment is trickier and repositioning has real value, or when the installer simply prefers not to work with wax. Neither approach is wrong; the important variable is the technique, not the material. A poorly installed wax-free gasket leaks just as readily as a poorly installed wax ring.
While you have the toilet off the floor, this is also an ideal moment to check related tank components. If the toilet has been running, hissing, or cycling on its own, a worn toilet flapper or a degraded fill valve is likely the cause, and both are quick repairs while the tank hardware is accessible. Similarly, if the toilet has ever clogged or flushes weakly, check the best toilet plungers of 2026 and our trapway size guide for whether the bowl design is limiting the flush. A wax ring replacement is the right time to assess the whole toilet, not just the seal. And if the flange shows corrosion at the supply shutoff, our roundup of the best wax rings of 2026 includes a broader look at matching ring type to flange and floor condition.
Manufacturer published specifications (TOTO, Kohler, American Standard)
FAQ
Frequently asked questions
? How do I know if my toilet wax ring needs replacing?
The three reliable signs are water pooling around the base of the toilet after flushing, a persistent sewer gas smell in the bathroom that does not go away with cleaning, and a toilet that rocks noticeably on the floor. A stable toilet with no smell and no water is almost certainly still sealed properly. If only the toilet rocks but there is no smell or water, try tightening the closet bolts first before committing to a full wax ring replacement.
? Can I replace a wax ring myself, or do I need a plumber?
Most homeowners with basic DIY experience can replace a wax ring themselves. The job requires no soldering, gluing, or special plumbing skills. The main physical challenge is lifting the toilet, which weighs 50 to 120 pounds depending on whether it is a two-piece or one-piece design. A helper makes the lift safe and the alignment much easier. The steps are straightforward and the parts are inexpensive and universally available.
? How long does it take to replace a toilet wax ring?
Most people finish a wax ring replacement in 90 minutes to two hours, including draining the toilet, lifting it, cleaning the flange, installing the new ring, reseating the toilet, and testing for leaks. A second set of hands cuts the time and makes the lifting step much safer. Factor in extra time if you discover a damaged flange that needs repair before the new ring can go in.
? Should I use a standard or extra-thick wax ring?
Use a standard-thickness ring when the top of the drain flange sits flush with or slightly above the finished floor surface. Use an extra-thick ring when the flange sits noticeably below the floor, which frequently happens after a tile remodel adds floor height. If you are unsure, measure the distance from the floor to the top of the flange: three-eighths inch or less means standard; more than three-eighths inch means extra-thick or double-stacked rings.
? Can I reuse a wax ring if the toilet was only lifted briefly?
No. A wax ring is a single-use seal. Once it has been compressed under the weight of a toilet, it has taken the shape of that specific installation. Lifting the toilet, even slightly, breaks the seal. The wax cannot be reformed into a uniform ring that will compress evenly and seal reliably a second time. Buy a new ring every time the toilet comes off the floor. They are inexpensive enough that reuse is never the right call.
? What is the difference between a wax ring with and without a horn extension?
A plain wax ring is just wax. A wax ring with a horn extension (also called a funnel or sleeve) adds a plastic tube that extends into the drain flange opening, guiding waste cleanly into the drain and helping keep the wax centered as you lower the toilet. The extension is recommended for most installations because it makes alignment easier and prevents solid waste from contacting the wax on the way through. Toilets with large trapways like the American Standard Champion 4 particularly benefit from the guided extension.
? Why is my toilet still leaking after I replaced the wax ring?
The most common reasons are that old wax was not fully removed before the new ring was installed, the toilet was slid sideways rather than lowered straight down so the wax was sheared, the ring was cold and stiff when installed, the closet bolts are loose so the toilet rocks and breaks the seal, or the flange itself is cracked or damaged. A leak that appears only after several flushes typically points to an incomplete seal from one of these installation issues.
? Do I need to replace the closet bolts when replacing the wax ring?
Not always, but it is strongly recommended whenever you have the toilet off the floor. Closet bolts corrode over time, especially in humid bathrooms, and a corroded bolt that will not tighten firmly is the main reason a toilet rocks after a wax ring replacement. New closet bolts are inexpensive and install in minutes while the flange is exposed. Skipping them and then having to lift the toilet again because a bolt failed is a preventable second job.
? What should I do if the toilet flange is broken or cracked?
Do not install a new wax ring over a broken flange. The toilet will not sit level, the bolts will not anchor properly, and the new ring will almost certainly fail quickly. Instead, use a flange repair ring, which is a metal or PVC overlay ring that bolts over the existing flange to provide new bolt slots and a stable seating surface. These repair kits are available at hardware stores and cover most common cast iron and PVC flange failures without requiring a drain stack repair.
? Is it normal to smell sewer gas after replacing a wax ring?
A brief sewer smell immediately after the job, before the new wax has been compressed and tested, is normal since the drain was open. After the toilet is fully seated, the bolts are tight, and the water has been reconnected, the smell should stop completely. A smell that persists after the toilet is reinstalled and tested leak-free usually means the wax ring has not fully sealed, the toilet is rocking slightly, or there is another source of sewer gas in the bathroom such as a floor drain with a dry P-trap.
? How tight should the closet bolt nuts be?
The nuts should be tightened snugly enough to eliminate any rocking, but not so tight that the porcelain base cracks. Work in small increments, alternating between the two bolts to bring the toilet down evenly. The porcelain base is not as strong as it looks under uneven point loading. A toilet that feels firm with no movement is correctly tightened. If you can flex the base by pressing down on one side, tighten slightly more, still alternating sides.
? How much does a plumber charge to replace a toilet wax ring?
Plumber rates for a wax ring replacement typically range from 90 to 250 dollars in most US markets, depending on labor rates in your area, whether the job reveals a damaged flange that needs repair, and how accessible the toilet is. The parts cost only 5 to 20 dollars. The labor is the primary cost, which is the main reason this is one of the most popular DIY plumbing repairs: the skill required is low and the savings versus a service call are substantial.
? Can a rocking toilet cause the wax ring to fail over time?
Yes, and this is one of the most common causes of wax ring failure. Every time a toilet rocks, the wax is kneaded back and forth slightly, and over months or years it works its way out of the seal position. A toilet that was not rocking when new but begins rocking after years of use has typically had its closet bolts corrode or loosen. Tighten the bolts at the first sign of rocking, before the seal is damaged. If the toilet already rocks and smells, both the bolts and the wax ring need replacement.
? Are wax-free toilet seals better than wax rings?
Neither is objectively better; each has advantages in specific situations. Wax-free seals are repositionable, which is a real advantage on tile floors where alignment is difficult. Traditional wax rings are cheaper, universally available, and have decades of proven performance. For most standard installations on a level floor, a wax ring with horn extension is the more cost-effective choice. Wax-free seals earn their extra cost in situations with uneven floors, transitions between floor materials, or jobs where the toilet may need to come up again soon.
? Does the toilet need to be caulked at the base after wax ring replacement?
Caulking is optional and somewhat debated among plumbers. The argument for caulking is a finished appearance and prevention of water from floor mopping getting under the toilet. The argument against is that a fully caulked base hides a wax ring failure: if the ring fails again, water is trapped under the toilet and damages the subfloor before any visible leak appears. Most plumbers either skip caulking or leave the back of the base uncaulked so any future leak will appear at the floor level where it can be caught early.
? What size wax ring fits most toilets?
Most residential toilets in the United States use a standard 3-inch or 4-inch closet flange, and a universal wax ring labeled for 3-inch to 4-inch flanges fits them. TOTO, Kohler, American Standard, Woodbridge, Swiss Madison, and Gerber all use standard flanges that accept these universal rings. You do not need a brand-specific wax ring. The variable to match is thickness (standard versus extra-thick), which depends on your flange height relative to the finished floor, not on the toilet brand.
? Should I replace anything else while the toilet is off the floor?
While the toilet is off the floor, it is practical to replace the closet bolts, inspect and clean the flange, replace the supply line, and inspect the fill valve and flapper inside the tank. If the toilet has been running or cycling on its own, replacing the flapper costs about five dollars and two minutes while the tank is already drained. See our guides to the best toilet flappers and best toilet fill valves for the top-rated replacement parts for 2026.
? How long does a wax ring last?
A properly installed wax ring can last 20 to 30 years or the entire lifespan of the toilet, as long as the toilet does not rock, the flange stays at the correct height, and the bathroom floor does not shift significantly. Wax rings do not dry out or degrade chemically under normal conditions. The main causes of early failure are a rocking toilet, a damaged flange, improper installation technique, or a floor renovation that changed the height relationship between the flange and the finished surface.
Our Verdict
Replacing a toilet wax ring is one of the most rewarding plumbing jobs a homeowner can complete: the parts cost under twenty dollars, the tools are ones most homes already have, and the payoff is a toilet that no longer smells, leaks, or rocks. The keys to a successful replacement are removing every trace of old wax before installing the new ring, choosing the correct thickness for your flange height, lowering the toilet straight down without lateral movement, and pressing firmly and evenly to compress the wax. Replace the closet bolts and supply line while the floor is open, inspect the flange for cracks before you reseat, and use a helper for the lift. Done correctly, a new wax ring lasts decades. Done hastily, it leaks in weeks. The difference is almost entirely in the preparation and technique, not in the part itself.
Derek researches plumbing specifications, installation requirements and parts availability, cross-checking manufacturer claims against owner-reported reliability. Rankings are based on documented data and real owner reports, never paid placement.
Updated August 2026 · Plumbing
Keep reading
Related guides
Best Toilet Flush Valve: How to Choose the Right One
Plumbing
4.6
Which is the best toilet flush valve? Compare 2-inch, 3-inch, adjustable, and canister flush valves by fit and flush power, plus how…