Why Toilet Trapways Are Curved Like an S
Toilets4.6
Learn why toilet trapways curve like an S, how each bend blocks sewer gas, and what the shape means for clogs and…
Read the guideA toilet spraying water inside the tank sounds like a hiss, a trickle, or a rapid filling noise that repeats long after every flush. The spray itself is almost always the fill valve inlet or the refill tube misdirecting water, and the fix is usually a five-dollar part swap or a thirty-second adjustment. This guide walks you through diagnosing exactly where the spray is coming from, which part is at fault, and how to stop it without calling a plumber.
A toilet spraying water inside the tank is almost always a loose or cracked fill-valve cap, a misrouted refill tube spraying above the overflow tube opening, or a failed fill-valve seal shooting water sideways. Remove the tank lid, flush, and watch. The source of the spray becomes visible within seconds and the fix takes under thirty minutes.
Opening a toilet tank and finding water spraying in all directions is alarming the first time it happens. The tank lid may rattle, water may hit the underside and drip around the base, or you may simply hear a faint hissing mist that never quite settles after a flush. Every one of those symptoms traces back to a small number of parts, and each can be diagnosed just by watching a single flush cycle with the lid removed.
The fill valve is the vertical mechanism on the left side of the tank that controls water flow from the supply line into the tank. The refill tube is a small flexible hose clipped into the top of the overflow tube, designed to send a trickle of water into the bowl to reseal the trap after a flush. A third, less common source is the ballcock or fill-valve body itself cracking under water pressure. Understanding which part is spraying tells you exactly what to buy and where to direct the repair. For a broader look at how the tank system connects to overall flush performance, our guide on the best flushing toilets explains the mechanics in full.
The fill valve operates under household water pressure, typically 40 to 80 PSI, from the moment the flush cycle opens the supply line. The valve's job is to direct all that water straight down into the tank so it refills quietly and completely. When any part of the valve breaks, loosens, or misaligns, pressurized water escapes in the wrong direction. That is a spray, not a trickle. The refill tube is a separate, lower-pressure stream, but when it detaches from the overflow tube it becomes a free hose spraying wherever the natural curve points it, which is often directly at the tank wall or lid. Both problems have the same visible signature: water going somewhere it was not designed to go.
| Source of Spray | What You See | Likely Cause | Difficulty |
|---|---|---|---|
| Fill valve cap (top) | Water shoots sideways from valve top during fill | Cap cracked, loose, or seal missing | Easy |
| Refill tube | Small tube spraying freely inside tank | Tube slipped out of overflow tube | Easy |
| Fill valve body (side) | Mist or stream from mid-section of valve | Worn internal diaphragm/seal | Moderate |
| Fill valve tower (crack) | Visible split, water leaks at crack under pressure | Physical crack from age or impact | Replace valve |
| Supply line connection | Spray at bottom of valve/tank fitting | Loose shank nut or failed washer | Easy |
| Ballcock plunger seal | Water bypasses closed float on old-style ballcock | Worn cup washer on plunger | Moderate |
The diagnosis takes one flush. Here is what to look for at each location.
Top of the fill valve: When the flush cycle opens the supply and water rushes into the tank, look immediately at the very top of the fill valve. A properly functioning valve has a sealed cap that directs all water downward. If water sprays sideways or upward from this point, the cap is cracked, has worked loose, or is seated incorrectly after a previous repair. Press down firmly on the cap. If the spray slows or stops under hand pressure, the cap is loose. If it continues, the cap itself is cracked.
Small tube moving freely: During the fill cycle you should see a thin, flexible tube, usually a quarter inch in diameter, clipped into the top of the tall center pipe in the tank (the overflow tube). That is the refill tube, and it should stay fixed. If it is moving around freely or pointing at the tank wall, it has detached or was never properly seated. This is the easiest fix of all.
Mid-section of the valve body: If water sprays from a joint or seam partway down the valve shaft during filling, the internal diaphragm, the rubber seal that regulates flow inside the valve, has cracked or hardened. This seal is not replaceable on many modern column-style valves, making the whole valve the part to swap.
Base of the valve / tank bottom: A spray right at the tank floor near the valve shank can mean a loose lock nut or a failed rubber washer at the supply line inlet. Tighten the shank nut a quarter turn at a time, or replace the supply-line washer.
A single flush with the lid off tells you everything. Most people spend twenty minutes trying to guess the cause from the noise before they realize the answer is right there the moment water starts flowing. Remove the lid, flush, and look. You will see the spray immediately and know which of the four fixes applies. This is a straightforward plumbing diagnostic that needs eyes, not tools, to start.
This is the most common source of an internal spray, and the fix for a loose cap is literally a single twist. The cap on modern column-style fill valves, including the widely used Fluidmaster 400A and compatible aftermarket valves, locks into the valve tower with a bayonet mount. Over time, vibration from repeated flushes can cause the cap to work counterclockwise and loosen. When the supply pressure hits a loose cap, water shoots out from under the cap rim at high speed.
1. Turn off the water supply valve at the wall by turning it clockwise until it stops.
2. Flush to lower the tank water so you can work without getting soaked.
3. Locate the fill valve on the left side of the tank. The cap is the topmost piece, usually a round disc or dome shape.
4. Press down on the cap and rotate it clockwise (looking down from above) about a quarter to a half turn until it clicks or firms up.
5. Turn the supply back on slowly and watch the cap closely during refill. A properly seated cap shows no spray at all.
6. If the spray continues, the cap has a crack and needs replacing. Remove the old cap by pressing and rotating counterclockwise, take it to the hardware store to match the model, and snap the replacement on.
The refill tube job is simple: it trickles a small amount of water into the bowl through the overflow tube after each flush to refill the trap, which blocks sewer gas. When it detaches, the tube becomes a small pressurized hose pointing wherever it wants, spraying the tank wall, the lid, or the floor of the tank. The clip holding it in place is a tiny plastic piece and is easily dislodged if someone reaches into the tank, if the tube is too long, or if the overflow tube's rim is worn smooth.
1. Identify the overflow tube: the tall, open-topped pipe in the center of the tank.
2. Find the refill tube: the thin, flexible hose attached to the fill valve nozzle partway up the valve body.
3. Guide the free end of the refill tube so it points straight into the top of the overflow tube, with the tip sitting about half an inch inside the rim.
4. Clip the plastic holder (if present) onto the rim of the overflow tube. If the clip is missing or broken, use a new refill tube clip, which costs almost nothing and slides onto any overflow tube rim.
5. Check tube length. The tube should have just enough slack to reach the overflow tube without looping down and touching the water surface. A tube that dips into the water can create a siphon that draws tank water into the bowl continuously. Trim it with scissors if it is too long.
6. Turn the supply on and confirm the refill tube stays in place for the full fill cycle.
A refill tube that consistently falls out may be because the overflow tube rim is worn or because the tube itself has stiffened and curled. In that case, replace the refill tube entirely; it is sold as a universal part and takes one minute to swap.
A fill valve spraying from its body, not from the cap, has a cracked tower or a failed internal diaphragm. Neither is repairable in place; the valve is the unit to swap. Universal fill valves such as the Fluidmaster 400A fit virtually all two-piece and most one-piece toilets and are widely available. They come pre-assembled with instructions on setting the height adjustment.
1. Turn off the supply valve at the wall completely.
2. Flush to empty the tank, then use a sponge or towels to remove any remaining water at the bottom.
3. Disconnect the supply line where it connects to the bottom of the tank. Have a small towel ready for the residual water in the line.
4. Reach into the tank and hold the fill valve body steady. Under the tank, unscrew the plastic or metal lock nut by hand or with slip-joint pliers, turning counterclockwise. One full turn is usually enough to loosen it.
5. Lift the old fill valve straight up and out of the tank.
6. Set the height on the new valve. The adjustment usually involves pulling up and twisting the top section. The valve should stand so its float cup travels freely from low-water to a point about an inch below the overflow tube top, and the critical water line marked on the valve tower ends up below the overflow tube rim.
7. Drop the new valve into the tank shank hole. Tighten the lock nut under the tank by hand until snug, then a quarter turn with pliers only. Overtightening cracks the tank.
8. Attach the new refill tube from the valve nozzle to the overflow tube.
9. Reconnect the supply line and turn the water on slowly. Let the tank fill and watch for any spray. Adjust the float if the water level needs fine-tuning.
Fill valve replacement looks intimidating on paper but is genuinely one of the most beginner-friendly plumbing repairs. The lock nut and supply line thread onto standard fittings, and no soldering or pipe cutting is involved. The job regularly takes less than twenty minutes for someone doing it for the first time, and the new valve refills the tank noticeably faster and quieter than an aging original. Universal valves fit about 95 percent of residential toilets, so there is no special ordering for most common models from TOTO, Kohler, American Standard, Woodbridge, or Gerber.
The tank lid on most toilets is unglazed on the underside and porous. Repeated high-pressure water contact from a spraying fill valve can etch the surface, deposit minerals, and eventually crack the lid from the thermal and mechanical stress of a pressurized stream. A cracked lid is purely cosmetic damage, but matching a discontinued lid color or style is surprisingly difficult and expensive. Water dripping around the lid edges onto the floor is a more serious concern, particularly on wood floors or in areas where standing water can seep under baseboards.
If you have heard the spray for more than a few weeks, inspect the lid underside for white mineral deposits or surface cracks before replacing it. A spray running against the tank wall can also create a mineral ridge that is harder to clean the longer it is left. Address the spray first, then clean the deposits with a white vinegar soak or a pumice stone rated for porcelain.
If the spray returns after you reseat the cap or replace the fill valve, the issue is one of three things: the water pressure in your home is too high, the replacement valve is not compatible with your flush valve configuration, or the lock nut is loose and the whole valve is rocking on the shank.
High water pressure: Residential supply pressure above 80 PSI can stress fill valve seals beyond their design rating. A pressure-regulating valve (PRV) installed on the main supply line reduces this. If your other fixtures also hammer or whistle, high pressure is the likely culprit.
Wrong valve height or float position: A fill valve set too tall can cause the float to catch on the tank interior walls, jamming the float below where it shuts off. The valve then overfills, and the excess escapes wherever it can, mimicking a spray. Reset the height so the float clears all tank walls freely.
Loose shank nut: If the fill valve rocks when you grip it, the lock nut under the tank is loose. Hand-tighten it firmly, then a quarter turn with pliers. A rocking valve vibrates under pressure and the cap can repeatedly loosen itself.
It is worth drawing that distinction clearly because the symptoms can seem similar if you hear running water without seeing where it goes. A spray inside the tank is visible the moment you remove the lid and flush. A leak at the base shows up as water on the floor around the toilet, often after flushing. A running toilet makes a continuous hissing or trickling sound at the bowl or tank but shows no spray when you open the lid. If your toilet is running, our guide on how to fix a running toilet covers the flapper and float fixes in detail. If water is gathering at the base, see our toilet leaking at the base guide. If the fill is very slow, our fill valve guide covers selection and water pressure factors.
A cracked tank is the clearest replacement trigger for this symptom. If you see water seeping from a hairline crack in the porcelain of the tank body itself, no valve fix will stop it. Tank replacements are sometimes sold separately as OEM parts for popular models, but matching an older tank often costs more than a complete new toilet. At that point, a modern WaterSense-certified toilet at 1.28 GPF or better is the better value.
The second realistic replacement scenario is an older 3.5 GPF toilet with a worn ballcock-style fill valve. Replacing the ballcock with a modern universal fill valve is still worthwhile and straightforward. But if the toilet also flushes poorly, has a small trapway, and has required repeated repairs, the cumulative cost of parts and time argues for an upgrade to a modern high-MaP toilet. An independent MaP test score of 800 grams or above is the benchmark for a toilet that will reliably clear solid waste without repeat clogs or repeat repairs.
The fill valve quality directly affects how long you go between tank repairs, which is why it is worth considering when buying a new toilet. Below are five toilets with strong tank-reliability records across owner reviews, with notes on their specific valve design.
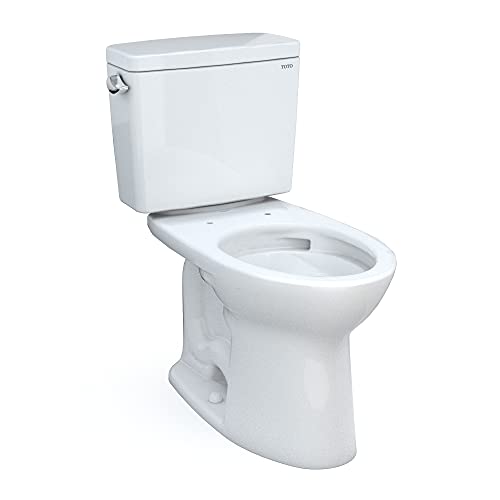
The TOTO Drake II earns its reputation for a fill valve and flapper system that owners consistently describe as quiet, reliable, and inexpensive to service, backed by a 1,000-gram MaP score and 1.28 GPF EPA WaterSense certification.
The TOTO Drake II's Double Cyclone flush system uses two rim jets rather than rim holes, reducing the chance of mineral clogs at the jet openings that often cause pressure loss in other toilets. The fill valve shuts off cleanly and quietly, and owners across aggregated reviews consistently note it goes years between any service needs.
TOTO publishes detailed replacement part numbers for every Drake II component, and the parts are available through major plumbing retailers. If you do eventually need to replace the fill valve on a Drake II, the shank size and configuration accept universal aftermarket valves without any adapter.
The Drake II is the toilet we consistently point to when someone wants to stop thinking about tank hardware entirely. The engineering of the fill and flush valve on this model is solid, the parts ecosystem is extensive, and the Double Cyclone flush delivers one of the cleanest bowl washes at 1.28 GPF in independent MaP testing.

The Kohler Cimarron replaces the traditional flapper with a canister flush valve that seals across a wide surface area, reducing the single most common cause of internal tank spray and running-toilet complaints from a worn flapper edge.
Kohler's Class Five flush system on the Cimarron uses a 3.25-inch canister that opens the full bore of the flush valve in one motion, delivering a powerful gravity siphon with no mid-stroke restriction. The wide sealing surface of the canister means there is no single rubber edge to warp or stiffen over time the way a traditional flapper does.
The Cimarron's 2.375-inch fully glazed trapway is the widest in this roundup, which directly reduces the likelihood of clogs that drive owners to reach into the tank and accidentally dislodge the refill tube or loosen the fill valve cap.
If the flapper-edge failure mode is what causes most internal tank sprays and running-toilet complaints, then a canister valve that eliminates the flapper is a logical design choice. The Cimarron executes this well, and the 2.375-inch trapway means you are unlikely to need to reach into this tank for clog-related reasons either.
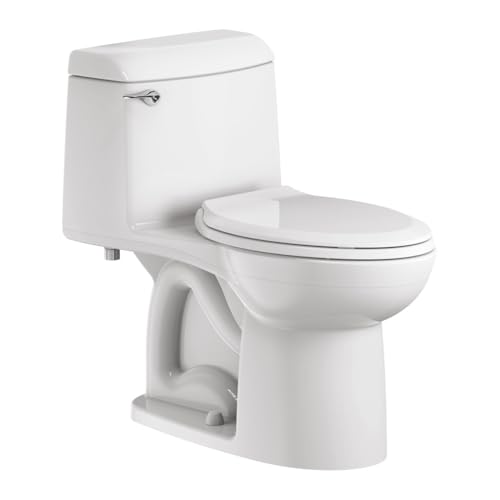
The American Standard Champion 4 uses a large 4-inch flush valve and a durable accelerator flushing system that creates a powerful flush with a fill valve and flapper system that owners consistently find easy to service.
The Champion 4's 4-inch flush valve is larger than the 3-inch valves in most toilets, which means the tank empties faster and the resulting siphon is stronger. The trade-off is a brand-specific flapper designed to seal that wider valve opening. Owners who replace the flapper with a universal part sometimes find it does not seal perfectly, which can cause a spray-adjacent issue (a slow flapper leak that eventually mimics running). Always use an American Standard replacement flapper on this model.
The fill valve on the Champion 4 is a standard column-style unit that is compatible with most universal replacement valves and is straightforward to service. The tank ergonomics make it easy to reach all parts without contorting.
The Champion 4 is the easiest recommendation for someone who wants maximum flushing power alongside a tank that is not difficult to work on. Just match the replacement flapper to the American Standard specification rather than grabbing a universal, and this toilet is one of the most reliably clog-free options available in this class.
The TOTO Aquia IV offers dual-flush at 1.0/0.8 GPF with TOTO's TORNADO FLUSH dual-nozzle system and a fill valve engineered for near-silent operation, making tank noise and spray issues rare across owner reviews.
The Aquia IV's fill valve is engineered to operate quietly even at the higher fill rates required after a dual-flush cycle, which reduces the pressure spikes that can loosen valve caps over time. The TORNADO FLUSH rim jets are fully rimless by design, which eliminates the under-rim jet holes that can accumulate minerals and reduce flush pressure in conventional toilets.
Owners who specifically note "no tank noise" on the Aquia IV are responding to TOTO's fill valve engineering, which uses a slower, controlled fill compared to high-flow universal valves. The slower fill extends valve seal life and virtually eliminates the cap-loosening vibration that causes spray complaints in some other models.
For households where water savings is a top priority alongside tank reliability, the Aquia IV is the strongest choice here. The 0.8 GPF liquid flush is the lowest available in a mainstream toilet that still carries EPA WaterSense, and TOTO's fill valve engineering is specifically designed to minimize the noise and vibration that cause the spray issues this guide addresses.
The Woodbridge T-0001 is a one-piece skirted toilet with dual-flush at 1.0/1.6 GPF and a fill valve and flush system that aggregated owner reviews describe as reliable out of the box, with universal replacement parts that fit without modification.
One of the structural advantages of the T-0001's one-piece design is the elimination of the tank-to-bowl bolts and gasket, which is a separate failure point on two-piece toilets. The fill valve is a column-style unit and owners who have needed to replace it confirm it accepts standard universal valves without any adapter hardware.
The skirted exterior means there are no exposed trapway curves to clean, but it also means the toilet sits closer to the wall and the supply line connection needs to be in the correct location. Measure your rough-in before ordering.
The Woodbridge T-0001 is a solid value one-piece if you want a modern, clean-looking toilet with a reliable fill valve and do not need an independently verified MaP score. The lack of published MaP data is the honest limitation here, but aggregated owner reviews are broadly positive on flush performance for everyday solid waste.
If you want a systematic check rather than chasing a specific symptom, this five-minute protocol covers everything. Use it before buying any parts.
1. Remove the tank lid and set it safely aside. Note the water level relative to the overflow tube before flushing.
2. Turn the supply off, flush, watch the fill valve from the side. As the water rushes in, look at the valve cap from the side. No water should spray laterally from the cap rim.
3. Check the refill tube position. With the supply back on and the tank filling, verify the thin refill tube tip is seated inside the overflow tube. It should stay still during the entire fill cycle.
4. Listen for the shutoff. The fill valve should shut off cleanly and silently once the water reaches the correct level. A valve that hisses past the shutoff has a failing internal seal.
5. Check the shank nut under the tank. Grip the fill valve body in the tank and try to rock it. It should be completely rigid. Any movement means the nut below needs tightening.
6. Inspect the supply line connection. Look at the coupling where the supply line meets the tank fitting. There should be no drips or mineral deposits. Drips at this joint mean a worn supply line washer or a loose coupling nut.
If everything passes that check and you still hear water, the problem may be in the bowl's refill function, specifically the trap not resealing because the refill tube is clipped above the overflow tube rather than inside it. That is a positioning fix, not a parts fix.
The most common cause is a fill valve cap that is cracked or has worked loose, directing pressurized water sideways instead of downward. The second most common cause is a refill tube that has slipped out of the overflow tube and is spraying freely. Both are visible the moment you remove the tank lid and flush.
It is not an immediate danger, but the spray can crack the tank lid from repeated impact, cause mineral deposits on tank surfaces, and allow water to drip outside the tank around the lid edges, which can damage floors over time. Fix it promptly but it is not an emergency requiring the water to be turned off immediately.
Press down on the fill valve cap and rotate it clockwise until it locks. If the spray stops under hand pressure, it was loose. If it continues, the cap is cracked and needs replacing. Remove the old cap by pressing down and twisting counterclockwise, match it at the hardware store, and snap the replacement in place.
The refill tube is a small flexible hose that connects to the fill valve nozzle and routes into the top of the overflow tube. Its job is to send a trickle of water into the bowl after each flush to reseal the trap, which blocks sewer gas. When the tube slips out of the overflow tube, it sprays freely inside the tank.
Yes, in the two most common cases. A loose cap is fixed by pressing and rotating it clockwise to lock it, which costs nothing. A dislodged refill tube is fixed by reclipping the tube end into the overflow tube opening. Only a cracked cap or a cracked valve body requires a replacement part.
Most fill valve replacements take fifteen to twenty minutes for a first-timer. The steps are: turn off the supply, flush and sponge dry the tank, disconnect the supply line, unscrew the lock nut under the tank, lift out the old valve, drop in the new one, reconnect, and turn the water back on. No special tools are needed beyond slip-joint pliers for the lock nut.
Universal fill valves such as the Fluidmaster 400A fit the vast majority of residential two-piece toilets and many one-piece models. They adjust in height to accommodate different tank depths. Before buying, confirm the tank bottom shank hole accepts a standard 7/8-inch inlet, which covers most toilets from TOTO, Kohler, American Standard, Woodbridge, Gerber, and Swiss Madison.
A hissing noise after fixing the spray usually means the fill valve has a worn internal seal that lets water trickle past even when the float is in the closed position. The valve cap fix and the internal seal are separate parts. If the hiss continues after reseating the cap, replace the entire fill valve, which resolves both the spray and any hiss simultaneously.
Fill valve cracks are caused by age and UV degradation of the plastic over time, impact from objects dropped into the tank, overtightening of the lock nut that stresses the valve tower, or high water pressure above 80 PSI that stresses the valve body repeatedly. If your home pressure is above 80 PSI, a pressure-regulating valve on the main line can prevent repeat fill valve damage.
Not directly. A spray inside the tank stays inside the tank. However, if the spray is partly caused by a fill valve that will not shut off, the water level can rise to the top of the overflow tube and drain continuously into the bowl. This does not overflow the toilet but does waste significant water continuously and can mask a fill valve failure that needs addressing.
Standard residential water pressure is 40 to 80 PSI. Pressure above 80 PSI can cause fill valves to vibrate, spray, and wear faster. Signs of high pressure include banging pipes when faucets close (water hammer), fill valves that need frequent replacement, and spray that returns shortly after a new cap is installed. A pressure gauge screwed onto a hose bib confirms the reading in seconds.
Check the supply line connection at the bottom of the tank. A loose coupling nut or cracked supply line can spray at the fitting in a way that looks like it originates inside the tank when the lid is off. Also inspect the toilet tank itself for hairline cracks; a porcelain crack under pressure can produce a fine spray that mimics a valve issue but does not stop when the valve is replaced.
Most major toilet warranties cover the porcelain bowl and tank for one year or more but exclude wear parts such as the fill valve, flapper, and refill tube. TOTO, Kohler, American Standard, and Gerber all exclude internal tank parts from the standard warranty. The fill valve is considered a consumable service part. Check your specific model's documentation to confirm what is covered.
A quality fill valve typically lasts five to seven years under normal water pressure and mineral conditions. Hard water areas see shorter life because mineral scale coats the internal diaphragm and seat. If your fill valve is older than five years and spraying or hissing, replacing it proactively is more cost-effective than diagnosing the exact worn seal.
Yes, in most TOTO two-piece models including the Drake, Drake II, and Entrada. The shank opening accepts standard 7/8-inch inlet universal valves. TOTO one-piece and washlet-integrated models may have proprietary configurations; check the model specifications before purchasing. The Aquia IV uses a TOTO-specific fill valve that is not directly swapped with universal parts.
A ballcock is an older fill valve design with a float ball on a horizontal arm that physically rises with the water level to shut off a piston valve. Modern column-style fill valves use a float cup that slides up a vertical shaft and trigger a diaphragm valve at the top. Both do the same job, but column-style valves are quieter, faster to refill, and the universal replacement standard in modern toilets.
If the spray was caused by a fill valve that would not shut off, yes. A fill valve running continuously or cycling on every few minutes to replace lost water can waste a significant amount of water per day. Fixing the valve so it shuts off cleanly after each fill restores normal water use and reduces the fill cycle count per day. A spray that stays inside a properly shutting-off tank has minimal water waste impact.
No. TOTO and Kohler use proprietary valve designs and their caps are specific to their own fill valve models. If you need a replacement cap, match the brand and valve model. Universal aftermarket valve caps are designed to fit specific brands of universal fill valves such as Fluidmaster, not original TOTO or Kohler factory valves.
Short-term, water spraying at the lid underside deposits minerals and can hairline-crack the porcelain lid. Medium-term, if the spray is accompanied by a fill valve that will not shut off, you waste water continuously. Long-term, repeated wet-dry cycles inside the tank can accelerate corrosion on the flapper seat and any metal components. None of these is an emergency, but the repair is fast enough that ignoring it makes little sense.
Not in most cases. Reseatng a fill valve cap, reclipping a refill tube, and replacing a fill valve are all tasks designed for homeowner service. A plumber adds cost without adding technical necessity for these repairs. The only scenario where a plumber is worthwhile is a cracked tank body that needs assessment before deciding repair versus replacement, or high water pressure that requires work on the main supply line.
A toilet spraying water inside the tank is almost always a loose fill valve cap, a dislodged refill tube, or a worn valve body, each of which is visible after one flush with the lid removed. Start by pressing the cap to check for looseness, confirm the refill tube is clipped inside the overflow tube, then replace the fill valve if the spray comes from the body. The job costs a few dollars and under twenty minutes. If you are considering a replacement toilet at the same time, the TOTO Drake II and Kohler Cimarron stand out for tank reliability and parts availability, while the American Standard Champion 4 offers the strongest gravity flush at an accessible price. All carry EPA WaterSense certification or independent MaP scores that confirm real-world performance.
Learn why toilet trapways curve like an S, how each bend blocks sewer gas, and what the shape means for clogs and…
Read the guideAlmost every US toilet has a left-side handle. Learn the plumbing and mechanical reasons behind the layout and when it actually changes.
Read the guideHome toilets rely on tanks because household water lines lack the pressure that public flushometer systems use to flush straight from the…
Read the guide