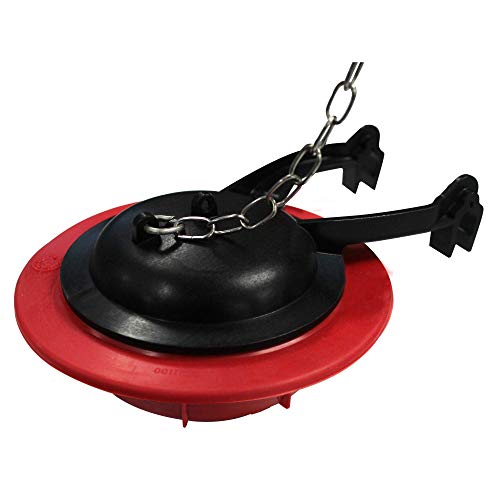
Toilet Flapper Keeps Going Bad: Causes and Long-Term Fix
Replacing your toilet flapper every six to twelve months is a sign that something in your system is chewing through rubber far faster than the normal three-to-five-year lifespan. This guide identifies the eight root causes that destroy flappers prematurely, the specific materials and designs that survive harsh water conditions, and the correct fix for each scenario so you stop buying flappers every season and start solving the problem once.
Quick Answer
A toilet flapper that keeps failing is almost always destroyed by in-tank chlorine tablets, hard water mineral buildup, or a mismatched size that never seals fully. The long-term fix is to remove any in-tank tablets, switch to a chlorine-resistant silicone flapper such as the Korky Max Wax Silicone, and clean the flush valve seat of scale before every install. That combination extends flapper life from months to several years.
A flapper that wears out once is normal maintenance. A flapper that wears out repeatedly is a symptom of a condition in the toilet system that will keep killing replacements until it is corrected. In most cases the culprit is one of three things: chemical attack from in-tank cleaning products, mineral scale abrading or stiffening the rubber, or a mismatched or undersized flapper that is never under quite the right amount of stress. Less commonly, the flush valve seat itself is damaged, and no flapper can seal against a pitted or corroded surface for long regardless of how good the rubber is.
This guide works through the full diagnostic tree so you can match the symptom to the correct root cause rather than guessing. It also covers which flapper materials survive which conditions, the real-world track records of flapper designs from the major brands, and the point at which the smarter long-term move is replacing the toilet rather than the flapper for the fourth time. For context on what healthy flushing looks like, see the best flushing toilets guide to understand the spec benchmarks a well-designed toilet should hit.
Dye test first. Before diagnosing why the flapper keeps failing, confirm the flapper is actually the leak source and not the fill valve. Add a few drops of food coloring to the tank and wait fifteen minutes without flushing. Color seeping into the bowl points to the flapper. A falling tank level with no color in the bowl points to the fill valve instead.
Why does a toilet flapper keep going bad?
A toilet flapper keeps going bad because chlorine or bleach from in-tank cleaning tablets degrades rubber rapidly, hard water mineral deposits abrade the sealing surface, the wrong size flapper distorts under constant stress, or the flush valve seat is corroded and cuts through replacement flappers. Each root cause requires a different fix rather than simply swapping the same flapper repeatedly.
A standard rubber flapper lasts three to five years under normal conditions, according to published guidance from manufacturers including Korky and Fluidmaster and consistent with aggregated owner review patterns. If yours fails within six to eighteen months, one or more of the following eight causes is active in your system.
Cause 1: In-tank chlorine or bleach tablets
This is the single most common cause of rapid flapper failure. Drop-in toilet tank tablets that fizz and tint the water blue, or any cleaner containing chlorine or bleach that sits in the tank water, maintain a continuous chemical bath around the rubber flapper. Chlorine degrades standard rubber by hardening the outer layer, which then cracks and warps within months rather than years. Flapper manufacturers including Korky explicitly state in published guidance that in-tank chlorine tablets void the product warranty and dramatically shorten service life. The fix here is complete: remove the tablet, flush the tank water clean, and switch to a bowl rim cleaner or a tank-insert type designed not to contact the rubber parts. A chlorine-resistant silicone flapper will survive better if you cannot eliminate the chemical source entirely.
Cause 2: Hard water mineral buildup
In areas with hard water, calcium and magnesium carbonate deposits build up on every surface inside the tank, including the round flush valve seat the flapper rests against. A crusty, roughened seat acts like very fine sandpaper against the soft rubber sealing surface of the flapper, wearing grooves into it that let water seep through. The deposit can also build directly on the flapper itself, stiffening it so it no longer conforms to the seat. The fix is to descale the flush valve seat thoroughly at every flapper replacement using white vinegar or a mineral-scale remover, and to consider a silicone flapper which is harder and more abrasion-resistant than standard rubber. If your water is extremely hard, a whole-home softener or a tank-safe descaling treatment is the upstream solution.
Cause 3: Wrong flapper size
Most toilets use either a 2-inch or a 3-inch flapper, matched to the flush valve opening diameter. A flapper that is even slightly undersized never quite covers the full opening and is held in a perpetually stressed partial-seal position. Over time the edge distorts and the seal fails entirely. A 3-inch flapper forced into a 2-inch seat cups oddly, develops irregular creases, and seals badly from day one. The fix is to confirm the flush valve size before any purchase, which takes thirty seconds: flush, watch the valve opening, and compare it to the reference images on flapper packaging, or physically take the old flapper to the store. Brands including TOTO, Kohler, American Standard, Woodbridge, and Gerber all publish the correct flapper size for each model in their specification sheets.
Cause 4: Damaged or pitted flush valve seat
The flush valve seat is the smooth circular rim the flapper rests against to seal. In an older toilet or one with a history of hard-water deposits, this surface can develop pits, corrosion spots, or hairline cracks that no replacement flapper can seal against for long. The soft rubber conforms to the rim imperfectly, water finds the low spots, and the leak continues through successive replacements. Before installing a new flapper, run your fingertip around the full circumference of the seat. Any roughness, ridge, or visible pitting means the surface needs attention. A self-adhesive seat repair ring, which glues over the existing rim to provide a smooth new sealing surface, is the correct fix and costs far less than replacing the flush valve assembly. If pitting is severe, a full flush valve replacement requires removing the tank but resolves the problem permanently.
Cause 5: Chain length set incorrectly
A lift chain that is too short holds the flapper a fraction of an inch off its seat at all times, keeping a constant slow leak that causes the flapper edge to wear in an irregular pattern. Over weeks the compressed edge distorts, the flapper becomes unable to seat flat even when the chain is later adjusted, and the part fails. A chain that is too long slips under the flapper and jams it open, causing both a running toilet and rapid edge damage. The correct chain length is approximately a half inch of slack when the flapper is closed. Confirm this every time a new flapper is installed before turning the water back on.
Cause 6: Flapper material mismatch for the water chemistry
Standard red or black rubber flappers are made from neoprene or EPDM rubber, both of which perform well in neutral, low-chlorine municipal water but fail faster in chlorinated systems or soft water that has been chemically treated. Silicone flappers, offered by Korky and a handful of other manufacturers, are inert to chlorine, bleach, mineral deposits, and most toilet cleaning products. The trade-off is cost: a silicone flapper costs roughly two to three times a standard rubber one, but it can last five to seven years or longer in conditions that kill a standard rubber flapper annually. If your water or cleaning habits are aggressive, the material upgrade pays for itself within the first replacement cycle.
Cause 7: Brand-specific flapper mismatch
While most flappers are standardized by the 2-inch and 3-inch sizing, a number of toilet models have unique flush valve geometry that requires a brand-specific part. TOTO toilets including the Drake, Drake II, UltraMax II, Vespin II, and Aquia IV use a 3-inch tower-style seal with specific mounting geometry; a generic 2-inch universal flapper will not properly cover the valve opening and will fail in weeks from edge stress. Some Kohler models including certain Cimarron, Santa Rosa, and Memoirs tanks use a canister flush valve with no traditional flapper, requiring a canister seal kit instead. American Standard's Champion 4 uses a 4-inch tower flapper. Installing the wrong brand-specific part on these designs is a reliable path to repeat failures. Published specification sheets from each manufacturer list the correct replacement part number for every model.
Cause 8: Old or low-quality replacement flapper
Not all replacement flappers are equivalent. Bargain-bin flappers from unbranded sources or dollar-store replacements use lower-grade rubber compounding that cracks within months regardless of water conditions. Published consumer review aggregates and plumber feedback consistently favor a narrow set of reliable brands: Korky and Fluidmaster for universal rubber and silicone options, and the original manufacturer's (OEM) part for brand-specific fits such as TOTO and Kohler. Paying the small premium for a name-brand part is the single cheapest insurance against repeat repairs.
Editorial Take
When a flapper fails within months, the first question to answer is not "which flapper do we buy?" but "what in our tank is killing flappers?" Nine times out of ten, removing an in-tank chlorine tablet and switching to a silicone flapper solves the repeat-failure problem permanently at a total cost under ten dollars. The valve seat check comes second and deserves a fingertip inspection every single time, because a rough seat can destroy a brand-new Korky in a matter of weeks. Only after ruling out chemistry and surface issues does the flapper selection itself become the variable worth optimizing.
Which flapper materials last the longest?
Silicone flappers last the longest, typically five to seven or more years, because they are chemically inert to chlorine, bleach, and mineral deposits that rapidly degrade standard rubber. EPDM rubber flappers are the second-most durable option and perform well in low-chlorine systems. Standard neoprene rubber flappers have the shortest lifespan, often under three years in treated municipal water and under twelve months in chlorinated tank environments.
The flapper material you choose should match your water conditions, cleaning habits, and budget tolerance for repeat repairs. The table below compares the main options on the dimensions that determine real-world service life.
Material
Expected Lifespan
Chlorine Resistance
Hard Water Resistance
Best For
Silicone
5 to 7+ years
Excellent
Excellent
Chlorinated systems, in-tank tablets, aggressive water
EPDM Rubber
3 to 5 years
Good
Good
Standard municipal water, no in-tank chemicals
Neoprene Rubber
1 to 3 years
Fair
Fair
Budget-friendly, low-chemical low-mineral water
OEM Brand-Matched
Per manufacturer spec
Varies
Varies
TOTO Drake/UltraMax II, Kohler Cimarron canister, American Standard Champion 4
What is the best long-term flapper replacement for repeat failures?
The best long-term replacement for a toilet flapper that keeps failing is a silicone flapper in the correct size, such as the Korky Max Wax Silicone for standard 2-inch toilets or the Fluidmaster PerforMAX for adjustable-volume applications. For TOTO toilets, the factory 3-inch assembly is the only part that preserves the original flush seal geometry and timing. Remove any in-tank cleaning products before installing the new flapper.
These three replacement options address the most common root causes of repeat failure and carry the strongest track records for longevity in real-world owner aggregates across hardware retail platforms.
Best for Repeat Failures
Korky Max Wax Silicone Flapper
Chlorinated water and in-tank chemical environments
4.8
Silicone construction that is chemically inert to chlorine, bleach, and mineral scale, which makes it the correct replacement when in-tank tablets or aggressive water chemistry has been destroying standard rubber flappers within months.
A universal 2-inch or 3-inch flapper with a dial to adjust how much water each flush releases; useful when chain-length and flush-volume interaction has been contributing to premature wear by holding the flapper at a non-optimal position.
When a generic universal flapper keeps failing on a TOTO toilet, it is almost always because the geometry does not match; the factory 3-inch assembly is the only part engineered to the exact seat diameter and tower mount of TOTO's flush valve design.
How do you fix a toilet flapper that keeps going bad for good?
To permanently fix a toilet flapper that keeps going bad, remove all in-tank chemical cleaners, inspect and clean or repair the flush valve seat, select the correct material (silicone for chemical environments) and size (2-inch or 3-inch as specified by the toilet model), set the lift chain with about a half inch of slack, and verify the seal with a dye test after every installation. Addressing the root cause rather than just swapping the part stops the cycle.
Work through the following sequence the next time you replace the flapper, and you should not need to return to this repair for several years.
Step 1: Remove everything from the tank
Open the tank lid and look for any in-tank tablet, hanging cleaner block, or drop-in disc. Remove it immediately and flush the tank water three or four times to clear residual chlorine concentration. This single step is responsible for extending flapper life from months to years in a large share of repeat-failure cases and costs nothing. If you want a clean-smelling bowl, switch to a rim-mounted tablet or a toilet bowl gel that never contacts the tank water or rubber parts.
Step 2: Inspect and restore the flush valve seat
Shut off the supply valve and drain the tank. Run your fingertip slowly around the full circumference of the circular flush valve seat. A healthy seat feels smooth and slightly slippery. A rough, gritty, or ridged seat means mineral scale is present; scrub it clean with white vinegar and a toothbrush or a soft scrub pad, avoiding anything abrasive that could scratch the surface. If you feel pits, grooves, or corrosion that persist after cleaning, apply a self-adhesive valve seat repair ring to restore a smooth sealing surface. A rough seat will destroy a new flapper within weeks regardless of the quality of rubber you choose.
Step 3: Confirm the correct flapper size and type
Identify whether your toilet uses a 2-inch or 3-inch flush valve opening. Measure the diameter of the opening, or look up the toilet model number, which is printed on the inside rear wall of the tank or on a label under the lid. TOTO models including the Drake II, UltraMax II, and Aquia IV specify 3-inch flappers or tower seals; the American Standard Champion 4 uses a 4-inch tower flapper; Woodbridge T-0001 and T-0019 and Swiss Madison St. Tropez use standard 3-inch flappers; Kohler Highline, Cimarron, and Santa Rosa in standard gravity configurations take a 2-inch flapper, while canister valve configurations in those same lines take a canister kit instead. Gerber Viper and Avalanche tanks are standard 2-inch. Confirming this before purchase is the step most repeat-failure cases skip.
Tip for canister valves. Kohler introduced canister-style flush valves on many of its mid-range and premium toilets. If the inside of your tank has a single large plastic tower in the center rather than a ball-cock and separate flapper, you have a canister valve. That design uses a canister seal kit, not a traditional flapper, and a flapper will never fit correctly. Kohler publishes the correct canister kit part number for each model on its website.
Step 4: Choose the right material for your water
If any of the following apply to your household, choose silicone over standard rubber: you live in a municipality with high chloramine or chlorine levels, your water hardness is above 200 parts per million, you have previously used in-tank tablets, or your region uses heavily treated recycled water. A silicone flapper such as the Korky Max Wax Silicone costs a few dollars more but is chemically inert to all of those conditions. Standard EPDM rubber flappers from Korky or Fluidmaster are appropriate for neutral, lightly treated well water or soft water without chemical additives.
Step 5: Install and set the chain correctly
Hook the flapper ears onto the two pegs on the overflow tube. The flapper should rest flat, centered, and fully covering the valve opening without any curling or bridging. Clip the lift chain to the handle arm at the hole that gives approximately a half inch of slack when the flapper is closed. Trim excess chain length with scissors so no loose tail can slip under the flapper during a flush. Turn the supply valve on, let the tank fill, flush three times, and listen for any running or cycling of the fill valve in the minutes after the tank settles.
Step 6: Run a dye test to confirm the seal
Add food coloring to the full tank and wait fifteen minutes without flushing. No color in the bowl means the flapper is sealed. Color seeping into the bowl means the flapper is still leaking; go back and recheck the valve seat surface and the chain slack before assuming the part is defective. Confirm the seal again after twenty-four hours, because some flappers seat more fully after a few flush cycles as the rubber conforms to the valve rim.
Editorial Take
In the majority of repeat-failure cases we see documented across owner forums and aggregated plumber feedback, the underlying pattern is the same: someone installs a standard rubber flapper in a tank that has a blue cleaning tablet, it fails in four months, they buy another, repeat. The fix is not a better flapper; it is removing the chemical source. Once the tank is chemical-free and the seat is smooth, a well-chosen flapper from Korky, Fluidmaster, or the toilet's OEM should comfortably reach three to five years with no further attention. The silicone upgrade is an insurance policy worth taking if your water is hard or heavily chlorinated, and on TOTO and Kohler toilets specifically, the OEM part is always the safest long-term choice.
How long should a toilet flapper last?
A toilet flapper should last three to five years under normal conditions in neutral, low-chlorine water without in-tank cleaning tablets. Silicone flappers can last five to seven years or more in the same environment. A flapper failing in under twelve months is abnormal and indicates a chemical, mineral, or mechanical cause that will destroy replacements at the same rate until it is corrected.
Manufacturer published guidelines from Korky and Fluidmaster and plumbing industry consensus consistently place the normal service interval for a rubber flapper at three to five years. Aggregated owner review patterns across major retail platforms support this range, with owners in low-chlorine areas reporting four to six years on EPDM rubber flappers, and owners who used in-tank tablets reporting failures as early as three months. The EPA WaterSense program, which certifies water-efficient toilets and components, recommends periodic inspection of flappers as part of an annual toilet maintenance check, acknowledging that even a healthy flapper approaching its design life can develop a slow leak that goes undetected by ear but wastes significant water volume over time.
When you find yourself replacing the same flapper more than once every two years, that frequency is diagnostic data rather than bad luck. Each of the eight causes above will produce a different combination of symptoms: chemical attack produces cracking and surface tackiness; mineral scale produces hardening and visible white crust on the rubber; wrong size produces asymmetric edge wear and distortion; a rough valve seat produces wear marks on a specific arc of the flapper's sealing edge; chain problems produce wear on the edge nearest the chain attachment point. A brief inspection of the old flapper each time you remove it will point you to the exact root cause.
When should you replace the toilet instead of the flapper?
Consider replacing the toilet when the flush valve seat is corroded beyond repair, the toilet is a pre-1994 model using 3.5 gallons per flush or more, the flapper has failed more than three times despite addressing root causes, or the toilet chronically produces weak flushes even with a healthy flapper. Replacing an old, high-water-use toilet with an EPA WaterSense certified 1.28 GPF model also delivers measurable water savings that offset the upgrade cost over time.
A toilet's design life is twenty to thirty years, and the flappers and fill valves within it are consumables with shorter cycles, so the calculus changes depending on where the toilet sits on that timeline. If your toilet is a pre-1994 model using 3.5 gallons per flush or an early 1994-to-1999 model using 1.6 GPF but producing MaP scores below 350 grams (the threshold EPA WaterSense used before raising it to 500 grams), then the toilet itself is both a water waste problem and a chronic performance problem that a new flapper cannot correct. At that point, an upgrade to a current-generation toilet with a MaP score of 800 grams or above and 1.28 GPF efficiency solves the flapper cycle and the water bill simultaneously.
The TOTO Drake and TOTO Drake II are the most consistently recommended upgrades in this scenario, with published MaP scores of 1,000 grams, 1.28 GPF water use, and EPA WaterSense certification. The Kohler Cimarron and American Standard Cadet 3 follow closely at MaP scores above 900 grams in their 1.28 GPF configurations. The Woodbridge T-0001 and T-0019 offer skirted designs at lower price points with MaP scores in the 800-to-1,000-gram range and standard 3-inch flappers that are easy to source. For a detailed look at how these models compare, the best flushing toilets guide covers their full spec profiles side by side.
For toilets under ten years old with a documented root cause now corrected, replacement is rarely necessary. A correct silicone flapper on a properly maintained valve seat in a tank free of chemical cleaners is a reliable long-term repair that costs less than ten dollars and takes under twenty minutes. Only when the underlying toilet design or valve geometry is too far degraded to support a reliable seal does upgrading the entire unit make more sense economically.
How does flapper quality affect flush performance?
A poorly sealing flapper directly reduces flush performance by allowing the tank to drain between flushes, meaning the fill line never reaches the correct level before the next use. A flapper that closes too early cuts the flush volume short, producing a weak, partial flush. A flapper that stays open too long or is too buoyant wastes water. The correct flapper for each toilet model maintains the designed flush volume and timing, which is how manufacturers achieve their published MaP scores.
This connection between flapper condition and flush power is underappreciated. A tank that holds only three-quarters of its designed fill due to a slow flapper leak will flush at roughly three-quarters of rated MaP strength on any given use. On a toilet rated at 1,000 grams MaP, that could mean real-world performance of 700 to 750 grams, a meaningful drop that can tip a marginal flush into a clog. If your toilet has recently started requiring two flushes for solid waste that previously cleared in one, confirming the flapper seal with a dye test is the correct first diagnostic step before investigating the trapway or bowl design. Our guide on toilet not flushing properly and the weak toilet flush fix walkthrough both start with the flapper for exactly this reason.
Flappers set to the wrong flush volume also affect performance in both directions. An adjustable flapper dialed too low produces a fast but water-thin flush that leaves solid waste behind; dialed too high it wastes water on flushes that do not need the full volume. If your toilet has been chronically clogging and you recently replaced or adjusted the flapper, confirm that the flush volume dial is set at the manufacturer-recommended middle position before troubleshooting the trapway or waste line. A weak or partial flush from an incorrectly set flapper mimics a clogging problem perfectly.
Editorial Take
The most overlooked connection in repeat flapper failure cases is between flapper health and clog frequency. A tank that silently loses an inch of water overnight because of a slow flapper leak will produce a weaker flush the next morning, and that weaker flush is exactly the condition under which solid waste fails to clear the trapway. Owners then report a clogging problem when the actual root is a leaking flapper robbing the tank of its designed volume. Fix the flapper first, confirm the seal, and let the tank reach full fill level before diagnosing the flush as genuinely weak. In many cases the clogging resolves without any further action once the seal is restored.
How do you check if the flapper is the cause of a running toilet?
To confirm the flapper is causing a running toilet, add food coloring or dye tablets to the tank and wait fifteen minutes without flushing. If color appears in the bowl, the flapper is leaking. A second test is to press gently on the top of the flapper with your finger while the toilet is running; if the running stops immediately, the flapper is not seating properly under its own weight and is the confirmed cause. No color and running that continues under finger pressure points to the fill valve instead.
The finger-press test is a fast field confirmation that takes ten seconds and requires no dye. Lift the tank lid, let the toilet run its phantom flush cycle, then press the center of the flapper flat against the valve seat with one finger. If the sound of running water stops immediately, the flapper body and seat surface are fine but something is preventing it from sealing under its own weight: most likely a chain that is too short, a mineral deposit creating a slight prop, or a flapper that is too buoyant for the flush volume setting. If pressing the flapper down does not stop the running, the water is bypassing the valve seat entirely through a crack or large pit, which points to a flush valve problem rather than a flapper problem. If the running continues with the flapper held down and also when released, the fill valve or overflow tube is the source.
A toilet that runs in short bursts every ten to twenty minutes, known as a phantom flush or ghost flush, is the signature pattern of a slow flapper leak. EPA WaterSense data estimates that a leaking toilet can waste 200 or more gallons per day, translating to a significant water bill impact annually. Because the repair is inexpensive and the environmental and financial cost of ignoring it is real, confirming and addressing a slow flapper leak promptly is one of the highest-value maintenance actions a homeowner can take. For a broader overview of all the conditions that cause a toilet to run continuously, our guide on how to improve toilet flush power covers the full diagnostic tree including fill valve, float, and overflow interactions.
FAQ
Frequently asked questions
? How often should a toilet flapper need to be replaced?
A healthy toilet flapper should need replacement every three to five years under normal conditions in neutral, low-chlorine water without in-tank cleaning products. Silicone flappers can last five to seven or more years. Needing replacement more than once every two years is a sign of an active root cause such as chemical attack, hard water scale, a rough valve seat, or a size mismatch that is accelerating wear.
? Do in-tank chlorine tablets really destroy flappers?
Yes. In-tank chlorine and bleach tablets maintain a constant chemical concentration around the rubber flapper that degrades it far faster than normal aging. Flapper manufacturers including Korky explicitly state that in-tank chlorine tablets shorten product lifespan and void warranties. Removing the tablet and flushing the tank clean is the single highest-impact step you can take to extend flapper life.
? What type of flapper lasts the longest?
Silicone flappers last the longest because they are chemically inert to chlorine, bleach, and mineral deposits that degrade standard rubber. In a clean, low-chemical water environment, EPDM rubber flappers from reputable brands like Korky or Fluidmaster also perform well and approach the five-year mark. Brand-matched OEM flappers are recommended for specific toilets like TOTO Drake or American Standard Champion 4 where generic sizing does not fit properly.
? Can a damaged valve seat cause flappers to keep failing?
Yes, and it is the most overlooked cause of repeat flapper failure. A flush valve seat with mineral scale, pits, or corrosion acts like sandpaper against the soft rubber sealing edge of the flapper, wearing grooves into it within weeks. Before installing any new flapper, run a fingertip around the full seat circumference and clean or repair it. A self-adhesive seat repair ring restores a smooth sealing surface without replacing the entire flush valve.
? Does hard water cause flappers to fail faster?
Yes. Hard water deposits calcium and magnesium carbonate on the flush valve seat and directly on the flapper body, stiffening the rubber and roughening the sealing surfaces. Areas with water hardness above 200 parts per million see shortened flapper life. A silicone flapper is more abrasion-resistant than standard rubber in these conditions, and descaling the valve seat with white vinegar at every flapper replacement helps preserve the new part's seal life.
? Why does my new flapper keep leaking right after installation?
The most common cause is a dirty or rough valve seat that the new flapper cannot seal against. Clean and smooth the seat before installing, confirm the correct size (2-inch versus 3-inch), and set the chain with approximately a half inch of slack. A chain that is even slightly too short holds the flapper a fraction off the seat continuously. Also confirm you removed any in-tank cleaning products before installing, as chemical residue in the tank water can immediately begin degrading the new rubber.
? Will a universal flapper work on my TOTO toilet?
Not reliably. TOTO toilets including the Drake, Drake II, UltraMax II, Vespin II, and Aquia IV use a 3-inch tower-style seal with specific mounting geometry that a generic 2-inch universal flapper will not cover or seat correctly. Installing a mismatched generic flapper on a TOTO toilet is a reliable path to repeat failure within weeks. Use the TOTO factory flapper assembly or a 3-inch flapper specifically rated for TOTO tower valves.
? What is the correct chain length for a toilet flapper?
Set the lift chain with approximately a half inch of slack when the flapper is closed. This allows the flapper to lift fully when the handle is pressed but does not leave it propped open. Too short a chain holds the flapper cracked open and the toilet runs; too long and the chain can slip under the flapper or the flush is weak. Adjust by moving the chain clip one hole at a time on the handle arm, then trim excess chain length.
? Is the Kohler Cimarron flapper the same as a universal 2-inch?
In standard gravity-flush tank configurations, many Kohler Cimarron models use a 2-inch flapper compatible with universal replacements. However, some Cimarron and other Kohler tanks use a canister flush valve rather than a traditional flapper, requiring a canister seal kit instead. Check the inside of your Kohler tank: if it has a large central tower rather than a separate flapper and valve, you need a Kohler canister kit, not a flapper.
? How do I know if my flush valve seat needs to be replaced?
If cleaning the valve seat with white vinegar and a soft brush leaves it still rough, visibly pitted, or grooved, it cannot provide a clean sealing surface for a flapper. A self-adhesive seat repair ring can restore the surface without tank removal. If the seat is cracked through or the metal body is corroded, a full flush valve replacement is the correct fix, which requires removing the tank from the bowl and is a more involved but definitive repair.
? Can a bad flapper cause weak flushing?
Yes. A flapper that seals poorly allows the tank to lose water between flushes, so the tank never reaches its full designed fill level. A partial tank produces a weaker, lower-volume flush that can fail to clear solid waste in one pass. A flapper that closes too early also cuts the flush volume short. Confirming the flapper seal with a dye test is the correct first diagnostic step when a toilet begins requiring multiple flushes for previously manageable waste loads.
? What size flapper does the American Standard Champion 4 use?
The American Standard Champion 4 uses a 4-inch tower flapper, which is larger than either standard 2-inch or 3-inch universal flappers. Installing a 2-inch or 3-inch flapper on a Champion 4 will result in a poor seal and either a continuously running toilet or a failed flush. American Standard sells the correct Champion 4 replacement flapper as a factory part and lists it by model number on its website.
? How does a phantom flush relate to a bad flapper?
A phantom flush, also called ghost flushing, is the toilet refilling itself spontaneously every ten to thirty minutes without being used. It is caused by a slow flapper leak allowing tank water to seep continuously into the bowl. When the tank level drops enough to trigger the fill valve, the toilet refills. This cycle repeats every time the tank drains to the trigger level. Confirming the leak with a food-coloring dye test and replacing the flapper stops phantom flushing immediately.
? Can I use a flapper with a float ball on my toilet?
Yes, if the toilet tank has sufficient space and your fill valve allows it. Flappers with an adjustable float or buoyancy collar, such as the Fluidmaster PerforMAX, let you control how long the flapper stays open and how much water the flush releases. This is useful for fine-tuning flush volume on toilets where the standard chain-length adjustment does not provide enough control. Confirm that the float collar does not contact the tank sides or overflow tube before installing.
? Should I replace the fill valve at the same time as the flapper?
If the fill valve is original and the toilet is more than seven to ten years old, replacing both at the same time is practical since the tank is already open. Fill valves are inexpensive and the second most common running-toilet cause after the flapper. If a dye test confirmed the flapper as the only leak source and the fill valve shuts off cleanly, replacing it is optional rather than necessary.
? How much water does a leaking flapper waste?
EPA WaterSense estimates that a continuously running toilet from a leaking flapper can waste over 200 gallons of water per day. A slower phantom-flush leak cycling every twenty minutes wastes tens to hundreds of gallons daily depending on severity. Over a month, a leaking flapper can add thousands of gallons to a home's water consumption, making even a minor flapper repair one of the highest-return home maintenance actions by water and cost savings.
? Why does my toilet run after I just replaced the flapper?
The most common reasons a toilet runs after a flapper replacement are: a chain set too tight so it holds the flapper slightly open, a valve seat that was not cleaned and is rough enough to prevent a full seal, the wrong flapper size installed (check 2-inch versus 3-inch versus OEM), or residual mineral debris floating in the tank and catching under the new rubber. Drain the tank, clean the seat, confirm the chain slack, and re-run the dye test before assuming the replacement part is defective.
? Is a silicone flapper worth the extra cost?
Yes, in almost every repeat-failure scenario. A silicone flapper costs roughly two to three times a standard rubber one, but survives the conditions that kill standard rubber in months: chlorine, bleach, mineral scale, and harsh water chemistry. In a clean, low-chemical environment the cost difference is minor and the longevity improvement is moderate. In a chlorinated or hard-water environment, a silicone flapper pays for the cost difference within the first replacement cycle it avoids.
? What is a good MaP score for a toilet I am considering upgrading to?
MaP, or Maximum Performance, testing scores a toilet's ability to flush bulk waste in grams. A score of 500 grams meets the minimum EPA WaterSense threshold. A score of 800 grams is strong for a household of two to three. A score of 1,000 grams, the test maximum, is ideal for large families and heavy-use bathrooms. TOTO Drake, TOTO Drake II, Kohler Cimarron, American Standard Cadet 3, and Woodbridge T-0001 all achieve 1,000-gram scores in their 1.28 GPF configurations.
Manufacturer published specifications (TOTO, Kohler, American Standard)
Korky flapper product guidance and published warranty terms, korky.com
Fluidmaster product specifications and installation guidance, fluidmaster.com
Our Verdict
A toilet flapper that keeps going bad is not a flapper problem; it is a system problem. Remove any in-tank cleaning tablets, inspect and smooth the flush valve seat, confirm you have the right size and material for your toilet model and water chemistry, and set the chain with a half inch of slack. A silicone flapper such as the Korky Max Wax Silicone is the correct long-term choice for chemically aggressive or hard-water environments. For TOTO toilets including the Drake, Drake II, and UltraMax II, only the factory 3-inch assembly reliably preserves the original seal geometry. Address the root cause once, and you should not need to return to this repair for several years.
Derek researches plumbing specifications, installation requirements and parts availability, cross-checking manufacturer claims against owner-reported reliability. Rankings are based on documented data and real owner reports, never paid placement.
Updated August 2026 · Plumbing
Keep reading
Related guides
Best Toilet Flush Valve: How to Choose the Right One
Plumbing
4.6
Which is the best toilet flush valve? Compare 2-inch, 3-inch, adjustable, and canister flush valves by fit and flush power, plus how…